If your users need to print some of the information in a form or calculator, you may provide a specially formatted print sheet that looks better on paper than just a plain print or screenshot of the web page.
SpreadsheetConverter allows you to create a separate layout just for printing. Typically, such a print sheet just copies information from other cells in the web form, using a more printer-friendly layout.
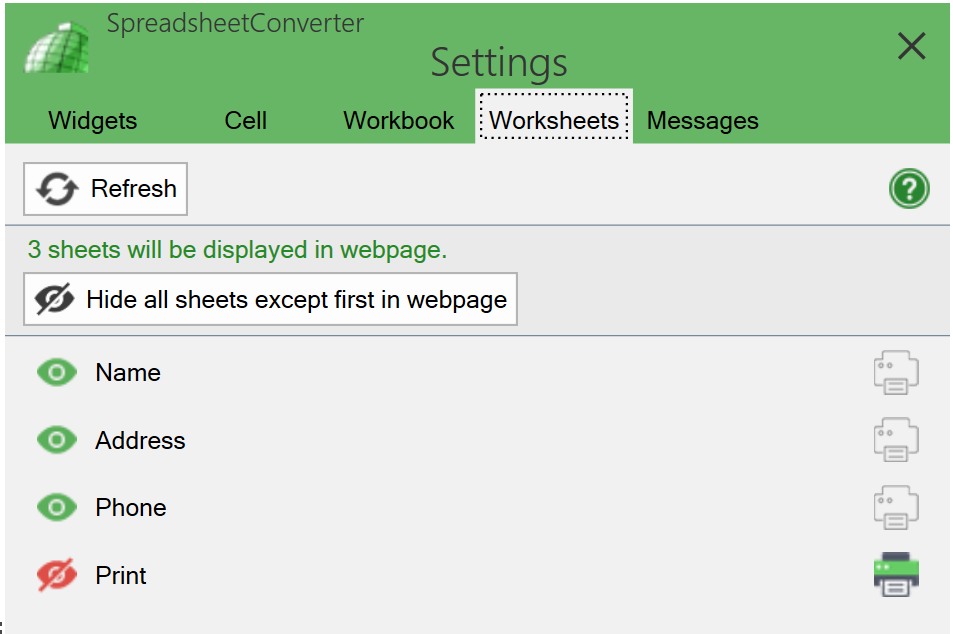
You designate the print sheet on the Worksheets tab of the task pane. If you have created it specifically for printing, you may also want to hide the print sheet.
Let’s face it – spreadsheets were never easy to print. Excel invites you to design in a landscape format that often becomes too wide for most printers.
Web pages can be tricky to print, too. They can be designed for legibility, which means there is a lot of guidance and helpful information. There can be excessive use of color and graphical symbols that isn’t optimized for printing.
If you are viewing a web page that uses responsive design for easier viewing on a narrow screen, printing it may create less than optimal results where only the left-most portion of each page is used.
To help you overcome issues like this, we designed the Print Sheet option. A print sheet is just like any other worksheet – you add text and formulas to it so that it contains the information you want to print. You can format the print sheet so that it fits the kind of printers you intend to use it with.
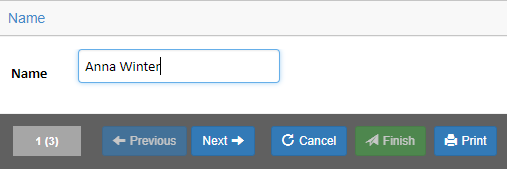
Let’s assume you have a little “wizard” as we call them, a web form consisting of multiple steps.
The first step asks for some information, after which the user presses Next.
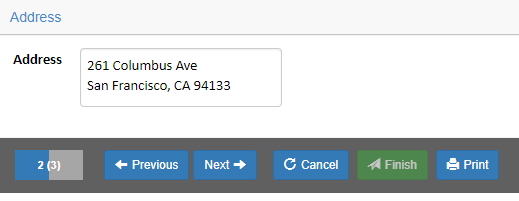
The second step asks for some other information, then Next.
There is also a third step in the wizard.
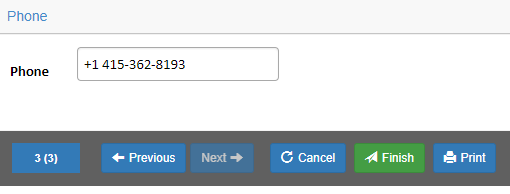
Printing this form would require three printed pages, with very little information on each page.
But when we press Print, the printed output actually looks like this:
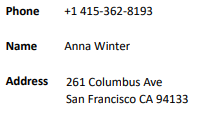
This is because the form has a print sheet designated for it on the Worksheets tab. The print sheet is not visible on the web page but automatically used when printing.
The layout of the print sheet is simple, it just aggregates the contents of the three wizard steps into one page.
The Print sheet does not have to be special in any way, it can be just any tab in the browser that is the only part of the page you ever want to print.
SpreadsheetConverter supports three printing operations:
If you initiate the print operation from the web browser with the Print menu option or the Ctrl-P keyboard shortcut, it corresponds to the Print operation in the list above.
In Excel, you create a print sheet just like any other worksheet. Just click on the small plus sign to the right of the rightmost worksheet tab.

You can give a print sheet any name you like, as long as it follows our general guidelines. Double-click on the tab name to change it. To reorder the tabs, just drag them to the positions you want.
You select the print sheet by clicking on the corresponding printer symbol on the Worksheets tab. Only one worksheet can be selected as the print sheet. To unselect a currently selected print sheet, click on the printer symbol again.
A print sheet is not hidden by default, but if you have created it specifically for printing it’s unlikely that you want the print sheet to be visible in the web page. You can hide it using the left-hand column, like in the example above. During the development of the print sheet, we recommend that you leave it visible so that the formatted result is visible in the Live Preview.
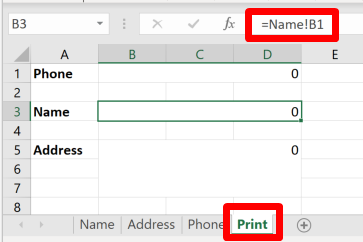
The print sheet can be any sheet in the workbook. To create a separate print sheet just for printing, you can copy content from the visible, web-formatted worksheets to the hidden print worksheet. Just enter an equal sign in the field, switch to the other worksheet and click in the cell you want to copy.
In the example below
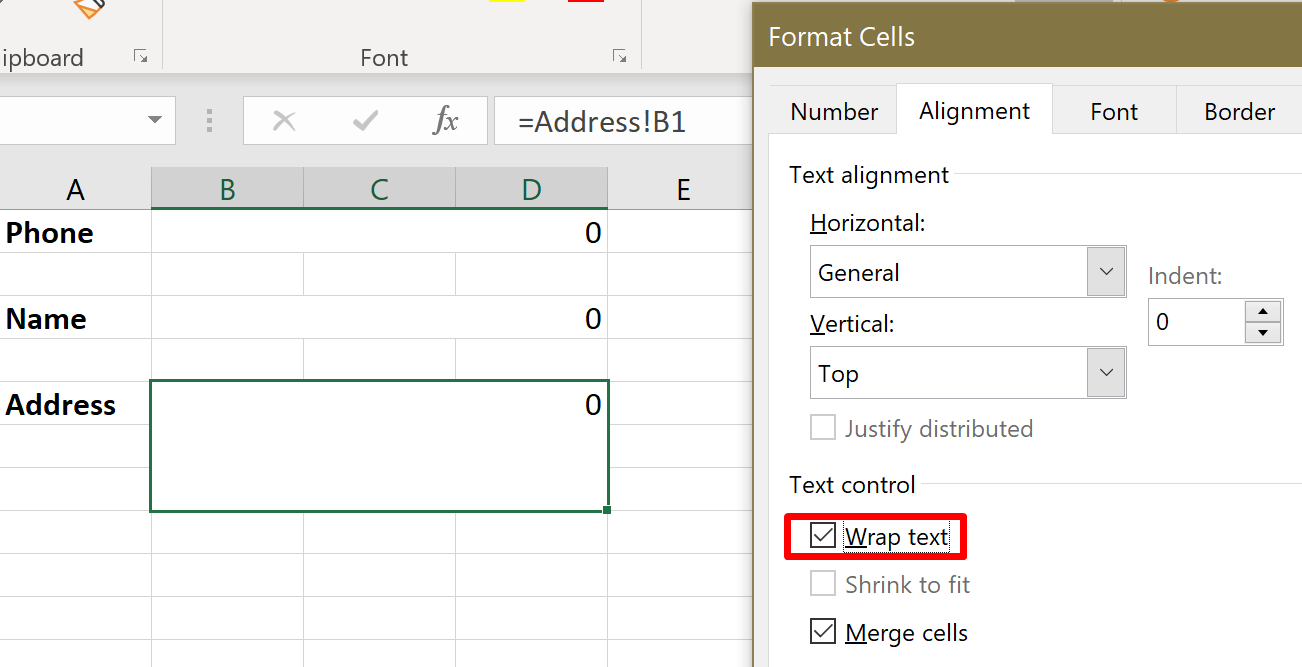
To print a multiline text field properly in a merged cell, ensure that you have enabled the Wrap text setting for the merged cell.
To format the page, you just use the ordinary Excel formatting options and use Live Preview to verify the result on the screen.
For last-minute adjustment of the page width and height, we recommend that you use the print preview option in your web browser to see the page when it has been formatted for printing.
When you have done most of the design work, you may want to hide the print sheet using the settings on the Worksheets tab.