When spreadsheets are converted to web pages, all cells are locked for input except those required to use the form or calculator. For forms, you may want to unlock additional fields for input, e.g. text fields that aren’t used in any calculations.
SpreadsheetConverter makes a clear distinction between these types of cells:
SpreadsheetConverter can automatically guess what cells in your worksheet you want to open for user input on the converted web page. It does this by looking at your formulas and seeing what cells they take their input values from.
If you want to use an empty cell for user input, or a cell containing text, you must explicitly open the cell for user input. There are several convenient ways to do this:
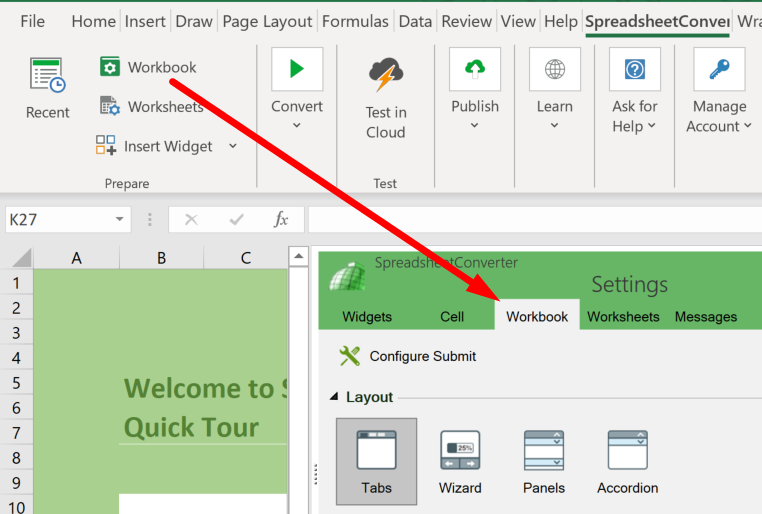
The settings for input cell selection are on the Workbook tab in the task pane.
In Excel, look for the SpreadsheetConverter tab at the right end of the menu ribbon. Click the tab to switch to the SpreadsheetConverter ribbon.
![]()
In the SpreadsheetConverter ribbon, click on Workbook so that the SpreadsheetConverter task pane becomes visible.

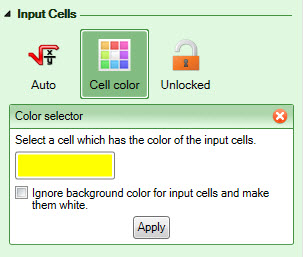
On the Workbook tab in the task pane, locate the Input Cells settings.

The first time you convert a particular spreadsheet, try using automatic detection first. Select Auto as the selection method.
With automatic detection, cell types are assigned like this:
Some input cells may not be obvious to SpreadsheetConverter’s automatic detection. If you are designing a form, you may want certain cells in the form to contain plain text input, e.g. address fields that you just want to be forwarded with the form when it is submitted.
All input widgets explicitly open cells for input, e.g:
If you need to open a large cell range in the spreadsheet for input, it may be tedious to insert many Text widgets. In this case, it’s much quicker to use a special background cell color for the cells you want to open for input from the user. During conversion, SpreadsheetConverter locks all cells except the cells with the selected background color.
Begin by giving all input cells in the spreadsheet the same background color, in this example yellow. Ensure that you use a background color that is not used elsewhere in the workbook. You must background color all input cells, also the ones referenced by your formulas, since they will not be opened automatically.
Before conversion, select Cell color for Input Cells selection on the Workbook tab. Then click on one of the cells that have the selected background color.

If you don’t want the input cells to actually use this background color on the web page, check the checkbox Ignore background color for input cells and make them white. You will still see the assigned color in Excel, but in the web page, all the input fields will have a white background.
If your spreadsheet uses Excel’s built-in protection mechanism for locked cells, you can also use it to explicitly unlock input cells. You must unlock all input cells, also the ones referenced by your formulas, since they will not be opened automatically.
Select Unlocked for Input Cells selection on the Workbook tab. Remember to unlock the worksheet before conversion!
Some of our tutorials partly focus on opening cells for input: